Friday, July 22, 2011

Bread Making Video - Tartine Bakery Home Version of Country Bread


I went to check out this video today after my friends made the bread at home and posted it on Facebook.   It made me cry.  Very inspiring.  I feel everyone should attempt to bake a loaf of their own bread at least once in their lives.  Bread baking may seem like a basic skill but it takes a master artist to invent something  this complex and amazing.  I don't think this bakery existed the last time I was in San Francisco, but I will be checking it out on my next visit!

Also, this is another good example of home cooks being inspired to go home and make something wonderful that they enjoyed at a favorite restaurant.  It makes me happy!

My friends version: 


From the Tartine Bakery Bread Cookbook http://www.tartinebakery.com/cookbooks.html

To testify on difficult this is,  google Tartine Bread baking blogs and you get a lot of  information on other peoples attempts.

Great job Jon and Ruth!!

Thursday, July 14, 2011

"A World of Flavors" Cooking Class & My Recipe for Chile Mole


 I hope you will  forgive me,... I know it's been a while since I've posted a blog, but I've been really busy. Lots of new clients, birthday parties, in-laws in town and starting up a new venture with a friend of mine, Elena Colombo of Ellena's Kitchen.  The B & E Cooking Club.  We will be teaching classes and providing in home cooking parties. One of the things I've been doing is prepping for a new class on the application of herbs and spices titled "A World of Flavors" that we finally got on its feet last weekend at the Surfas Test Kitchen in Culver City, CA.

I felt teaching this class was important because the art of flavoring food properly at home has become nearly a lost art.  Once men traveled the world, risking their lives while gathering and trading precious salts, spices and herbs and returning to their homeland, heroes laden with this treasure worth it's weight in gold.  We now take it all for granted even mostly ignoring that tiny spice section in the baking Ilse at the supermarket.  Many people not having even a clue what is in those little bottles or what superb things can be done with them. 

My partner and I tackled this very vast subject, by breaking it all down by international regions, Asia, Europe, Mediterranean, Middle East and so on, providing samples of spices to see and taste, demonstrations  and examples of applications and techniques (aka: lots of good food) gave them an extensive handout, answered lots of questions and provided resources where our students can purchase quality products. It was an amazing day.  We had a great turn out and lots of enthusiasm for the subject. 


Thanks to everyone that participated and a special thanks to the Spice House for helping to provide many of the spices we needed and for all their help and support.  Thanks to our students for participating and providing all their feedback and encouragement, especially Eileen for her lovely photographs I'm using today.  


Here is a recipe for my Chile Mole.  It was one of the dishes we used to illustrate Latin America.  Enjoy. 


Beth’s Chile Mole

Ingredients:

2 lbs extra lean ground beef or turkey
2 tbsp olive oil
4 garlic cloves or two tbsp garlic powder
3 tbsp kosher salt
2 ½ tbsp cumin
2 ½ tbsp cinnamon
3 tbsp chili powder
2 tbsp instant coffee
½ cup good cocoa powder
2 tbsp Worcestershire sauce
¼ cup BBQ sauce
1-2 canned chipotle peppers
1 cup red wine
1 large or 2 med onions
2 14.5 oz cans of diced tomatoes
1 8 oz can of tomato sauce
¼ cup peanut butter
1 lime
1 29 oz can of pinto beans
1 16 oz can of black beans (you can use any beans that you like)
½ red bell pepper
2 ears of fresh corn
Several sprigs of cilantro

Instructions:

Heat large 6 quart pot.  Add olive oil and ½ of all the dried spices, garlic and marjoram, heat for approx 30 secs.

The add ground meat, smashing with fork until there are no large clumps of meat and until meat is cooked through (if there is any water from the meat, let it cook off)

When done add rest of the spices and 2 of the tbsp of salt and let them really infuse with the meat.   (don’t worry  if spice mixture is sticking to the bottom a little it will come up when you add in the liquids.)

Next add onions and cook until very soft.  Add chipotle peppers, cocoa powder, stir until well combined (meat should look very dark and rich) then set aside on very low heat while you open cans of tomatoes. 

Put tomatoes and tomato sauce in blender or food processor, add remaining salt and pulse 2 or 3 times until smooth.  Then add them to the meat mixture.  Return to med heat and let cook down for about 20 mins.

Add peanut butter and juice from ½ lime.  Stir until incorporated, then add your beans, simmer for another 20 mins.

Slice the corn off the cobs, add it to the pot along with the red bell pepper and cilantro just before serving. 

Sunday, June 12, 2011

Chicken Medeira Recipe (Family Dinner Version)

My in-laws were in town for my daughter's 5th birthday last month and they wanted to go to their favorite upscale chain restaurant.  My husband ordered Chicken Medeira.  I have heard of this before, but have never ordered or thought to make it. It's one of those dishes that seems a little too heavy and usually served with a mountain of mashed potatos or pasta. Things I tend to avoid these days.  But my husband made me taste it. I have to admit, the sauce is absolutely mouthwatering and was not as heavy as I thought.  He asked me if we could add this to our home meal planning.  I said yes, but that I would need to create a recipe that was a little less heavy and little more family meal friendly.  Here you go.


Ingredients:

    • 1 lb chicken breast tenders
    • 4 tbsps of olive oil 
    • 1 package frozen asparagus spears
    • 2 cups grated mozzarella cheese 
    •  2 cups fresh crimini mushrooms, sliced  
    • 1 half  medium onion finely diced
    • 3 cups madeira wine 
    • 1 1/2 cups beef stock (you could also use chicken stock)
    • 1 tbsp butter
    • 4 tbsps flour or cornstarch
    • Salt and pepper to taste about 1 tsp each
    • 2 cloves garlic ot 2 tsps garlic powder 
    • 1/4 cup finely chopped fresh parsely

Directions

First chop your garlic (if you using fresh), onions, mushrooms and parsely and set a side.
Heat 2 tbsps olive oil in a large skillet over medium heat.
When pan is hot season chicken tenders with salt and pepper.
Saute chicken for 3 to 4 minutes or until the chicken has browned just a bit.  Don't over cook.
remove from pan and keep warm.
using the same pan, add two tbsps olive oil to the skillet.
Add the mushrooms, onions, garlic and saute until cooked down a little apprx 3-5 mins.
add 2 tbsps of flour or cornstarch (this will help create a roux to thicken your sauce)
Add the Madeira wine, stock and butter.
Bring the sauce to a boil, then reduce heat and simmer for about 20 minutes or until sauce has reduced.  The sauce will be done.
when it has thickened and turned a dark brown in color. If it doesn't thicken to your liking you can at this point mix a tablespoon of flour and a little cold water together in a cup and add to this to your sauce. Cook  a few more mins to thicken.
While your sauce is simmering, Thaw out the frozen asparagus in warm water or microwave for a couple of mins. (if your using fresh asparagus cook ahead of time and set aside)
Set the oven to broil.
Arranging the cooked chicken tenders on a baking pan. Cross 2-3 asparagus spears over each piece
Place grated or shredded mozzarella cheese on top
Broil the fillets for 3 to 4 minutes to melt the cheese and heat everything through.


To serve, arrange two chicken breast on each plate, spoon generous amounts of Madeira sauce over the chicken and sides.  I served mine with brown rice this time. 


(Adpated from a recipe I found on Food.com)

Tuesday, June 7, 2011

Cherry Clafoutis or the Easiest Dessert I Ever Made


So I saw this recipe in Saveur Magazine back in February. This French Cherry Clafoutis (pronounced Kla fou' tee) dessert,  was very light, not too many ingredients, just looked so amazing.  I was dying to make it, but I wanted to wait until the cherries were actually in or at least close to season.  So, after seeing and testing some at the market this week, I decide to give it swirl.


Here's the ingredients:

1 tbsp. butter
1 tbsp. vanilla extract
6 eggs
6 tbsp. sugar
1 1⁄4 cups milk
2 tbsp. kirsch
Pinch salt
3⁄4 cup flour
3 cups fresh ripe cherries, pitted or unpitted
Confectioners' sugar


1. Preheat oven to 425°. Generously butter a 9" cast-iron skillet or baking dish. Combine vanilla extract, eggs, sugar, milk, kirsch, (I didn't have any so I used Amaretto instead) and salt in a blender. Blend for a few seconds to mix ingredients, then add flour and blend until smooth, about 1 minute.
2. Pour batter into buttered skillet, then distribute cherries evenly over top. Bake until a skewer inserted into batter comes out clean and a golden brown crust has formed on top and bottom of clafoutis (mine also puffed up really nicely and pulled away from the side of the pan) , about 30 minutes. Dust with confectioners' sugar if you like.  The sugar was a must for me. 


That's it.  The easiest thing I've ever done. Not much harder than making a smoothie.   Hope you give it a try. 

Monday, May 30, 2011

Strawberry & Chocolate Cupcakes and My Daughter's 5th Birthday!


I've been crying all month as my baby girl, who turned five on Thursday, is no longer a baby.  My husband and I are watching as our only child's girlhood emerges and contemplating about what all that means,...  for us as well as for her.  Anyway, it's a big milestone, of course, and we all have made many friends at her preschool that she will be graduating from next month.  Everyone will be moving on and going off to different schools for kindergarten.  So, we wanted to have a special party to celebrate and to spend some time with people we might not be seeing much of in the future. 
My home couldn't accommodate everyone we wanted to invite so we had to hold it at a restaurant.  I decided to make the cupcakes for the event.  My little girl couldn't make up her mind between strawberry and chocolate so we chose to make both. 

I used  two Martha Stewart recipes.  The first was her basic white cake to which I added strawberry puree that I made to the batter.  After I filled the cupcake liners, I pushed a slice of fresh strawberry into the center of each one, frosted them with a Strawberry Cream Cheese Frosting (also made with the strawberry puree) and topped with a chocolate covered raisin.

Next I used Martha's Devil's Food  recipe, which I have to say, I was not really happy with.  If I could have done it over, I would have used Hershey's The Perfect Chocolate Cake recipe I've used in the past.  It produces a much richer, darker chocolate cake, I think.   I frosted them with a Chocolate Cream Cheese frosting and sprinkled  them with chocolate and candy covered sunflower seeds.  I think the frosting  and candy helped improve the cake quite a bit. 


The food and the cupcakes are important, but what makes a truly good party is good friends, which we feel we had in abundance.  It was a lovely day and my daughter was very happy. (She's the one holding the stuffed wolf cub) Thanks to all the friends and family that celebrated with us this weekend.  We love you all.  Have a good Memorial Day everyone. 

Recipes

Strawberry Cupcakes http://bit.ly/mIC0Vg

Strawberry Cream Cheese Frosting http://bit.ly/c5DJxY

Devil's Food Cupcakes http://bit.ly/lZgGwp

My preference: The Perfect Chocolate Cake recipe
from Hershey's http://bit.ly/iY8JJn

Chocolate Cream Cheese Frosting http://jcp.is/ksQ0Wh

I purchased candy toppings at Trader Joes. 

Saturday, May 21, 2011

HCG Diet Recipes


I started the HCG Diet (the original 500 cal one) on April 29th.  I now have 5 days left before I go on the maintenance phase.  As of now I have lost 16 ½ pounds.  I’m hoping by the time I finish I’ll be down 18-19lbs.  Those of you who haven’t heard of it, here is a link for some information.  http://simeonsdiethcg.com/about-the-diet

Now having said that, I am not personally endorsing this diet or this site, nor am I inviting any debate on this diet’s merits.  I am not a doctor.  I just know that many people are on this or are thinking about trying it and I wanted to share some recipes and techniques I created that might help with the boredom that can occur as this is a very restricted diet.   Also, I want to state that if anything I post here is similar or even exactly like other recipes you have seen it is purely coincidental.

You can’t use any oil, so make sure you have a non stick pan or some kind of “grill” to use.  All these recipes are for single servings, adjust accordingly for more people.


“Mole” Seasoned Poultry

3.5 oz Turkey or Chicken (uncooked)
Mix together and set aside in a bowl:
½ tsp chili powder
1 tbsp cocoa powder
½ tsp ground cumin
¼ tsp cinnamon
½ tsp ground or dried marjoram
A few drops of water to form a paste or use as a dry rub

¼ cup of fat free chicken or veggie stock (don’t add to spice mixture)
A couple of sprigs of cilantro

Directions: 
Heat a small non –stick skillet or grill.
Pat your poultry with paper towels till it’s dry.  Season it with salt and pepper.  Then dip it in the paste or dry rub you created; make sure it’s evenly distributed over the poultry.
When your skillet is ready, place your meat in the pan.
Turn the heat down to medium and let it sear really well, even let it blacken a little. 
After 3 minutes, flip it over and sear the other side 3 minutes as well.
Then slowly add the stock to the pan. Turn the heat down a little more and let it simmer for a few more minutes until the meat is cooked through.  The broth should be cooked down as well making a nice sauce. 

Place your meat on or next to your veggie choice and then pour on any remaining sauce.   Add your cilantro now if you like.


Curried Shrimp

3.5 oz of Shrimp (approx 5 medium) cleaned and peeled
¼ to ½ cup veggie stock
2 tsp Yellow curry powder
Or
½ tsp turmeric
¼ tsp cinnamon
¼ tsp mustard powder
1/8 tsp cloves
¼ tsp ground ginger
¼ tsp cumin
Couple of sprigs of cilantro

If you like, you can grill the shrimp a head of time for 5 minutes turning once and set aside.

Directions:
In a small skillet heat all the dry ingredients together just a minute to toast them a little.  This will help bring out the flavors.  Then slowly add the stock and bring to a simmer.
Once stock is simmering add in your uncooked shrimp and let simmer for 3 to 5 minutes.  Don’t overcook or shrimp will become tough. Add cilantro in and let it wilt a little.  Serve immediately over your veggies.

If you grilled your shrimp ahead, add it to the simmering stock and just let it heat through quickly 1- 2 mins. 

Note:  Will also work well with Chicken  and serve with cucumber slices. as shown at the top of this post.


Asian Chicken

3.5 oz boneless chicken breast (uncooked)
Mix together in a small saucer:
2 tsp Braggs Amino Acids (this replaces soy sauce)
1 tbsp rice wine vinegar
½  tsp garlic powder
1 tbsp fresh grated ginger or ½ tsp dried ground
Salt and pepper to taste
1/8 tsp stevia powder  (optional)

¼ cup chicken stock (do not add to marinade)
1 lemon wedge

Directions: 
Place chicken in marinade for a few minutes.
Heat small skillet or grill.
When heated place chicken in pan (turn down heat to medium) and let sear for 3-4 minutes on each side. Let it blacken a little.
Then slowly add stock and let simmer until chicken is cooked through.  Serve with veggie, cilantro and squeeze lemon wedge for extra flavor.

Note this will also work well with fish.


“Honey Mustard” Tilapia

1 or 2 tbsp of brown or Dijon mustard
1 tbsp apple cider vinegar
1 tsp Braggs Amino Acids
1/8 tsp Stevia powder (or to taste)
¼ cup veggie or chicken stock
Lemon wedge

Directions:
Mix mustard, vinegar, BAA and Stevia together. Coat the fish well on both sides with mixture and set aside.
Heat your skillet on high.  When heated place fish in pan and turn down to medium heat cook for 3 minutes on each side, then slowly add stock and let simmer on low for a 2 more minutes.  Remove and serve immediately with lemon wedge.

Note also works nice with chicken.

Saturday, April 30, 2011

Review of Recipe Finder SuperCook

We've all been there, standing in front of the almost empty fridge and cupboards. You don't have time to go to the store. "There's got to be something I can make out of this stuff here." Usually you can come up with something, but you're soooo tired and it just won't come to you, or you can never figure out what to cook. This is why I've become a strict meal planner, but for those of you who aren't or who need some inspiration, there's SuperCook, An easy to use, free and kinda fun, all in one recipe finder.


Take a look at this quick tutorial.


It took me about a half hour to log in all the food in my fridge and pantry. Also, items were very easy to add and subtract. Then it retrieves a list possible recipes (lots of them) very quickly. They loaded almost instantly. When you click on a recipe it takes you to the original site, for example, Epicurious.com. Awesome! When you find one that you like, you can save it to your account.  It becomes a one stop recipe file/database rather than having to look for all your favorites stashed all over the Internet.  Nice!!!   I highly recommend.
http://www.supercook.com/

Saturday, April 23, 2011

How To Make Butter and Easy Butter Molds

Every year around Easter I make my own butter.  I use spices, herbs and fruit to make compound butters and create pretty molds with the butter as well. This may sound very impressive to some, but it is really very easy. Here's how you make the butter. 


First, you don't have to have a churn. You only need an ordinary stand mixer and a whisk attachment (not the paddle.)

1 quart of Heavy Whipping Cream, or more depending on how much you want to make. 1 quart makes two batches about a 1lb of butter. 

Pour half the cream in the mixing bowl and start out at low med speed until the cream begins to form soft peaks, then gradually increase the mixer speed as the cream gets stiffer until you're at the highest speed and then let it run full blast for 5-6 minutes. 

It becomes very obvious when it's butter.  The yellow butter fat completely separates and will start to form a ball on the whisk leaving behind the whey.
You can save this and use it for baking.   
I just usually discard the whey. It's called butter milk, but it's not really what you buy in the store.  To make that, you have to add a special buttermilk culture, so what you're really left with here is a little bit of ordinary milk. 


Scoop out the butter and place immediately into an ice bath for a few minutes, then gently squeeze out the whey with your fingers, (make sure your hands are completely clean) keep dunking your hands and the butter in the ice bath so it doesn't melt while your working it. 

When it's all clean of the whey, it's done.  


Divide the two batches and salt one, ( I used a pink sel) and leave the other unsalted. 


Fill some molds and place them in the freezer. 

With the butter that's left over I make some compound butters. 

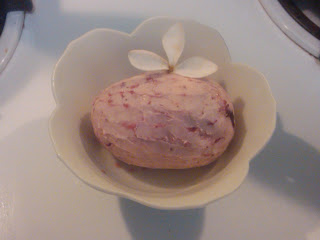
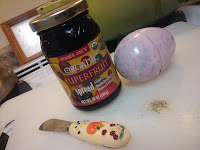
Here I made one with a fruit spread and a pinch of cardamom. I filled an ordinary plastic Easter egg to create an egg mold. 
Then I took the rest and made an herb butter, with salt, pepper, garlic powder, chopped fresh parsley and dried oregano. 

Also, if you've been invited to someone elses house for the holiday, a homemade butter mold is nice thing to bring for dinner. 

Be careful to use only a small amount of the ingredients in the butter. You want to flavor the butter a little, not over power it. 
Present it how ever you like and enjoy your holiday!!! 


        Happy Easter. 

Monday, April 18, 2011

Perfect Matzah Ball Soup


Ok, there is a lot of argument about what's a good matzah ball - hard and dense or soft and light so they almost fall apart in the pot.  That's how I prefer them.  This is how you get them. 

If you have a from scratch Matzah Ball recipe it's pretty much the same as the box recipe so I just use the box mix.  Pick your favorite. I've tried them all they, all come out the same.  Follow the directions exactly. 

Then form your ball. Grab two table spoons full of dough and form a ball. Roll it around in your hands for just a few seconds as lightly as possible  like you would if your were forming a small ball of clay.  They don't have to be perfect so don't handle too much tying to get the perfect roundness.  If you do they will get dense and hard.  Add 8 cups of chicken or veggie stock to a large stock pot.  Taste the stock if it's kind of bland season with a little kosher salt and fresh ground pepper.  Bring to a boil and then immediately bring the heat down to a simmering boil (just a little bit of bubbling breaking the surface of the stock.  Once it's simmering then add in your your uncooked matzah balls.  let simmer for 20-25 minutes covered.   


While the MB's are simmering add 3 tablespoons of extra virgin olive oil to a new large pot then 1 diced onion 2 cloves of garlic (more if you like it), 3 diced celery stalks, salt and pepper and 1 tablespoon of Za'atar spice blend.  If  you don't have that add a little cumin and oregano. Cook them down on med high until they begin to stick to the bottom of the pot. Then deglaze the pan with a little wine (about a cup) and let it cook down until the wine is mostly gone.  Then add 1 large carton of fresh chicken or veggie stock simmer for a 10 minutes then add the fresh veggies and stock into the Matzah balls and broth cooked earlier.  Let all simmer together for another 10 mins or so.  Then happy Passover! 

For garnish add some fresh grated carrots and either flat leaf parsley or cilantro. 

Note:  Cooking the Matzah balls and the veggies separate keeps the broth from getting too starchy and gloppy.

Thursday, April 14, 2011

Day of Spice Grinding and Organizing


I got a new spice grinder this week.  The Cuisinart  from Williams Sonoma on sale for for $29 (usually $75) my old cheap coffee grinder that I was using finally burned out and I had all these whole Indian spices and seeds that needed to get ground up.  Anyway,  I'm going to plug this one because the grinding bowl and lid are self contained and can just be thrown in the dishwasher.  No hard clean up.  And I also heard that you can give these a good work out with no problems of burning out.

I do all this as part of my Spring pantry clean up. I get rid of all my outdated spices and dry goods and replace them with fresh new ones but last week, before I got started, I also got pretty disgusted with my old spice organizer as well and went in search of something better.  So I purchased this Select-a-Spice organizer from Kitchen Art that arrived today. 
Ground some new spices and filled it up. 
Wow! am I happy!


I chose this one because, except for a small window, the spices are generally protected from light and heat which keeps them fresh longer.  You can scoop or pour large or small amounts from the top and it also has an auto measure tool  at the bottom letting you measure out a 1/4 teaspoon at a time. Also these containers hold a lot of product. Twice as much as my other little jars.  You can purchase more than one and stack them, or mount them under a cabinet.  It spins of course. It goes with my kitchen as well.  Now I can reach the electrical outlet that was always covered up by the old one.  Bonus!

I'm not getting anything for plugging these, just trying to be helpful.  Here are the links where I purchased on line if you are interested.    Spice grinder is now $39.00.   http://bit.ly/fXPCMu   and    http://bit.ly/fZd0Z1

Seem like a lot of trouble?  Well, not really, its kind of fun and if you want to up your game as a cook, a variety of fresh spices, especially fresh ground spices are one the best ways to bring more flavor to your food.  Please feel free to share your spice or pantry organizing ideas here in comments or on my Facbook page.

Tuesday, April 12, 2011

Radish Raita Cooking Video


The ABCD's of Cooking: Radish Raita from Chitra Agrawal on Vimeo.

I found this girl absolutely charming -  that laugh of hers... Her name is Chitra and she has a blog http://abcdsofcooking.blogspot.com/ I like this video because I felt she really did a great job of displaying and making accessable Indian cooking techniques.  I know that I will be trying this out soon. :)

Wednesday, April 6, 2011

Flavored Biscuits

I needed to bake something for a Parent's Association meeting at my daughters pre-school, so decided to bake biscuits.  I haven't made these from scratch in years so thought it was about time, also it's something my four year old could help me with which is always fun.  I got a recipe from E-How for Raisin Biscuits and I adpated a cheese biscuit recipe from Serious Eats.  Please forgive my goofy smart phone pics.  :)


Cinnamon Raisin Biscuits

things you'll need:


  • 2 Cups Flour
  • 1 tbsp. Baking Powder
  • 1 tsp. Salt
  • 3 tbsp. Sugar
  • 1/2 tsp. Cinnamon
  • 1 Stick Softened Butter
  • 2/3 cup butter milk
  • 1/4 cup Raisins
  • powdered sugar for dusting

PREHEAT OVEN TO 400 DEGREES and line a baking sheet with parchment paper.


MIX ALL OF THE DRY INGREDIENTS FOR THE BISCUITS IN A MEDIUM RELATIVELY FLAT BOWL. Stir together the flour, baking powder, cinnamon, sugar, and salt.

  •  
    CUT THE BUTTER INTO THE FLOUR MIXTURE USING A FORK OR PASTRY BLENDER.
    This step is done when it is the consistency of coarse crumbs.
  •  
    STIR THE RAISINS INTO THE DRY BISCUIT MIXTURE AND ADD THE MILK.
    1/4 cup raisins is usually sufficient. 2/3 cup milk should make the dough moist.
  •  
    TURN THE DOUGH ONTO A FLOURED SURFACE.
    With highly floured hands fold the dough five or six times. Pat into a half inch thick circle.
  • USE A FLOURED BISCUIT CUTTER TO CUT BISCUITS.
    PLACE BISCUITS ON BAKING SHEET LINED WITH PARCHMENT PAPER AND PLACE IN THE OVEN FOR 10-12 MINS. 
  • sprinkle biscuits with powdered sugar.  SERVE WARM.

Tips & Warnings

  • Keep the dough as moist as possible for the best biscuits
  • Every edge of the biscuit should be cut to help it rise correctly.

Parmesan Herb Biscuits

Makes 18 medium biscuits, active time 25 minutes, total time 45 minutes 
  • 2 cups all purpose flour
  • 2 teaspoons baking powder
  • 1 teaspoon salt
  • 4 tablespoons butter
  • 2 ounces Parmesan cheese, fresh grated not canned
  • 1/4 cupchopped fresh herbs (parsley, thyme and rosemary)
  • 1 cup butter milk

Procedures


  1. Preheat the oven to 400°F and line a baking sheet with parchment paper for easy cleanup. In a medium bowl. combine the flour, baking powder, and salt, Whisk to combine. Cut the butter into several pieces and add it to the flour, With your fingertips, rub the butter into the flour until you have very small pieces throughout. Add the cheese and herbs, and stir to distribute. Add the milk and stir to combine.

  2. Flour your work surface lightly. Remove the dough from the bowl, put it on your floured surface, and pat it into a rough square about 9 inches across. Fold the dough in thirds, like a letter, pat it down again until it's about an inch thick, turn it 90°F, and fold in thirds again.

  3. Dust your work surface with flour again, if needed, and roll the dough to a thickness of 1/2 to 3/4 inches. Using a biscuit cutter or other similar tool, cut circles from the dough and place them on your prepared baking sheet.

  4. Re-roll the scraps. You'll get a better rise out of the next batch of biscuits if you keep the dough oriented the same way instead of rolling it up or smashing it together. The folding in the previous steps has created horizontal layers that cause the biscuits to rise, just like the layers in pastry crust or puff pastry. So, when you combine the scraps, keep the horizontal layers horizontal as much as possible. Cut more biscuit from the rerolled biscuit dough. If you don't want to end up with even more scraps, consider cutting the second batch into squares instead of rounds.

  5. Rather than rolling the scraps a third time, you can make a few hand-formed biscuits from whatever is left after the second batch is cut They won't be pretty, but they're fine as samples for the cook.

  6. Brush the tops of the biscuits with butter milk or melted butter, if desired, and bake at 400°F until lightly browned, about 20 minutes


My Final Products: I used a scalloped biscuit cutter for both.  I think they looked nice this way.  Next time I might roll them a little thicker and cook them for a few minutes less.  They over cooked a little, but tasted delicious.