Saturday, April 30, 2011

Review of Recipe Finder SuperCook

We've all been there, standing in front of the almost empty fridge and cupboards. You don't have time to go to the store. "There's got to be something I can make out of this stuff here." Usually you can come up with something, but you're soooo tired and it just won't come to you, or you can never figure out what to cook. This is why I've become a strict meal planner, but for those of you who aren't or who need some inspiration, there's SuperCook, An easy to use, free and kinda fun, all in one recipe finder.


Take a look at this quick tutorial.


It took me about a half hour to log in all the food in my fridge and pantry. Also, items were very easy to add and subtract. Then it retrieves a list possible recipes (lots of them) very quickly. They loaded almost instantly. When you click on a recipe it takes you to the original site, for example, Epicurious.com. Awesome! When you find one that you like, you can save it to your account.  It becomes a one stop recipe file/database rather than having to look for all your favorites stashed all over the Internet.  Nice!!!   I highly recommend.
http://www.supercook.com/

Saturday, April 23, 2011

How To Make Butter and Easy Butter Molds

Every year around Easter I make my own butter.  I use spices, herbs and fruit to make compound butters and create pretty molds with the butter as well. This may sound very impressive to some, but it is really very easy. Here's how you make the butter. 


First, you don't have to have a churn. You only need an ordinary stand mixer and a whisk attachment (not the paddle.)

1 quart of Heavy Whipping Cream, or more depending on how much you want to make. 1 quart makes two batches about a 1lb of butter. 

Pour half the cream in the mixing bowl and start out at low med speed until the cream begins to form soft peaks, then gradually increase the mixer speed as the cream gets stiffer until you're at the highest speed and then let it run full blast for 5-6 minutes. 

It becomes very obvious when it's butter.  The yellow butter fat completely separates and will start to form a ball on the whisk leaving behind the whey.
You can save this and use it for baking.   
I just usually discard the whey. It's called butter milk, but it's not really what you buy in the store.  To make that, you have to add a special buttermilk culture, so what you're really left with here is a little bit of ordinary milk. 


Scoop out the butter and place immediately into an ice bath for a few minutes, then gently squeeze out the whey with your fingers, (make sure your hands are completely clean) keep dunking your hands and the butter in the ice bath so it doesn't melt while your working it. 

When it's all clean of the whey, it's done.  


Divide the two batches and salt one, ( I used a pink sel) and leave the other unsalted. 


Fill some molds and place them in the freezer. 

With the butter that's left over I make some compound butters. 

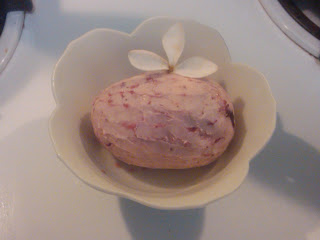
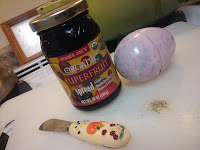
Here I made one with a fruit spread and a pinch of cardamom. I filled an ordinary plastic Easter egg to create an egg mold. 
Then I took the rest and made an herb butter, with salt, pepper, garlic powder, chopped fresh parsley and dried oregano. 

Also, if you've been invited to someone elses house for the holiday, a homemade butter mold is nice thing to bring for dinner. 

Be careful to use only a small amount of the ingredients in the butter. You want to flavor the butter a little, not over power it. 
Present it how ever you like and enjoy your holiday!!! 


        Happy Easter. 

Monday, April 18, 2011

Perfect Matzah Ball Soup


Ok, there is a lot of argument about what's a good matzah ball - hard and dense or soft and light so they almost fall apart in the pot.  That's how I prefer them.  This is how you get them. 

If you have a from scratch Matzah Ball recipe it's pretty much the same as the box recipe so I just use the box mix.  Pick your favorite. I've tried them all they, all come out the same.  Follow the directions exactly. 

Then form your ball. Grab two table spoons full of dough and form a ball. Roll it around in your hands for just a few seconds as lightly as possible  like you would if your were forming a small ball of clay.  They don't have to be perfect so don't handle too much tying to get the perfect roundness.  If you do they will get dense and hard.  Add 8 cups of chicken or veggie stock to a large stock pot.  Taste the stock if it's kind of bland season with a little kosher salt and fresh ground pepper.  Bring to a boil and then immediately bring the heat down to a simmering boil (just a little bit of bubbling breaking the surface of the stock.  Once it's simmering then add in your your uncooked matzah balls.  let simmer for 20-25 minutes covered.   


While the MB's are simmering add 3 tablespoons of extra virgin olive oil to a new large pot then 1 diced onion 2 cloves of garlic (more if you like it), 3 diced celery stalks, salt and pepper and 1 tablespoon of Za'atar spice blend.  If  you don't have that add a little cumin and oregano. Cook them down on med high until they begin to stick to the bottom of the pot. Then deglaze the pan with a little wine (about a cup) and let it cook down until the wine is mostly gone.  Then add 1 large carton of fresh chicken or veggie stock simmer for a 10 minutes then add the fresh veggies and stock into the Matzah balls and broth cooked earlier.  Let all simmer together for another 10 mins or so.  Then happy Passover! 

For garnish add some fresh grated carrots and either flat leaf parsley or cilantro. 

Note:  Cooking the Matzah balls and the veggies separate keeps the broth from getting too starchy and gloppy.

Thursday, April 14, 2011

Day of Spice Grinding and Organizing


I got a new spice grinder this week.  The Cuisinart  from Williams Sonoma on sale for for $29 (usually $75) my old cheap coffee grinder that I was using finally burned out and I had all these whole Indian spices and seeds that needed to get ground up.  Anyway,  I'm going to plug this one because the grinding bowl and lid are self contained and can just be thrown in the dishwasher.  No hard clean up.  And I also heard that you can give these a good work out with no problems of burning out.

I do all this as part of my Spring pantry clean up. I get rid of all my outdated spices and dry goods and replace them with fresh new ones but last week, before I got started, I also got pretty disgusted with my old spice organizer as well and went in search of something better.  So I purchased this Select-a-Spice organizer from Kitchen Art that arrived today. 
Ground some new spices and filled it up. 
Wow! am I happy!


I chose this one because, except for a small window, the spices are generally protected from light and heat which keeps them fresh longer.  You can scoop or pour large or small amounts from the top and it also has an auto measure tool  at the bottom letting you measure out a 1/4 teaspoon at a time. Also these containers hold a lot of product. Twice as much as my other little jars.  You can purchase more than one and stack them, or mount them under a cabinet.  It spins of course. It goes with my kitchen as well.  Now I can reach the electrical outlet that was always covered up by the old one.  Bonus!

I'm not getting anything for plugging these, just trying to be helpful.  Here are the links where I purchased on line if you are interested.    Spice grinder is now $39.00.   http://bit.ly/fXPCMu   and    http://bit.ly/fZd0Z1

Seem like a lot of trouble?  Well, not really, its kind of fun and if you want to up your game as a cook, a variety of fresh spices, especially fresh ground spices are one the best ways to bring more flavor to your food.  Please feel free to share your spice or pantry organizing ideas here in comments or on my Facbook page.

Tuesday, April 12, 2011

Radish Raita Cooking Video


The ABCD's of Cooking: Radish Raita from Chitra Agrawal on Vimeo.

I found this girl absolutely charming -  that laugh of hers... Her name is Chitra and she has a blog http://abcdsofcooking.blogspot.com/ I like this video because I felt she really did a great job of displaying and making accessable Indian cooking techniques.  I know that I will be trying this out soon. :)

Wednesday, April 6, 2011

Flavored Biscuits

I needed to bake something for a Parent's Association meeting at my daughters pre-school, so decided to bake biscuits.  I haven't made these from scratch in years so thought it was about time, also it's something my four year old could help me with which is always fun.  I got a recipe from E-How for Raisin Biscuits and I adpated a cheese biscuit recipe from Serious Eats.  Please forgive my goofy smart phone pics.  :)


Cinnamon Raisin Biscuits

things you'll need:


  • 2 Cups Flour
  • 1 tbsp. Baking Powder
  • 1 tsp. Salt
  • 3 tbsp. Sugar
  • 1/2 tsp. Cinnamon
  • 1 Stick Softened Butter
  • 2/3 cup butter milk
  • 1/4 cup Raisins
  • powdered sugar for dusting

PREHEAT OVEN TO 400 DEGREES and line a baking sheet with parchment paper.


MIX ALL OF THE DRY INGREDIENTS FOR THE BISCUITS IN A MEDIUM RELATIVELY FLAT BOWL. Stir together the flour, baking powder, cinnamon, sugar, and salt.

  •  
    CUT THE BUTTER INTO THE FLOUR MIXTURE USING A FORK OR PASTRY BLENDER.
    This step is done when it is the consistency of coarse crumbs.
  •  
    STIR THE RAISINS INTO THE DRY BISCUIT MIXTURE AND ADD THE MILK.
    1/4 cup raisins is usually sufficient. 2/3 cup milk should make the dough moist.
  •  
    TURN THE DOUGH ONTO A FLOURED SURFACE.
    With highly floured hands fold the dough five or six times. Pat into a half inch thick circle.
  • USE A FLOURED BISCUIT CUTTER TO CUT BISCUITS.
    PLACE BISCUITS ON BAKING SHEET LINED WITH PARCHMENT PAPER AND PLACE IN THE OVEN FOR 10-12 MINS. 
  • sprinkle biscuits with powdered sugar.  SERVE WARM.

Tips & Warnings

  • Keep the dough as moist as possible for the best biscuits
  • Every edge of the biscuit should be cut to help it rise correctly.

Parmesan Herb Biscuits

Makes 18 medium biscuits, active time 25 minutes, total time 45 minutes 
  • 2 cups all purpose flour
  • 2 teaspoons baking powder
  • 1 teaspoon salt
  • 4 tablespoons butter
  • 2 ounces Parmesan cheese, fresh grated not canned
  • 1/4 cupchopped fresh herbs (parsley, thyme and rosemary)
  • 1 cup butter milk

Procedures


  1. Preheat the oven to 400°F and line a baking sheet with parchment paper for easy cleanup. In a medium bowl. combine the flour, baking powder, and salt, Whisk to combine. Cut the butter into several pieces and add it to the flour, With your fingertips, rub the butter into the flour until you have very small pieces throughout. Add the cheese and herbs, and stir to distribute. Add the milk and stir to combine.

  2. Flour your work surface lightly. Remove the dough from the bowl, put it on your floured surface, and pat it into a rough square about 9 inches across. Fold the dough in thirds, like a letter, pat it down again until it's about an inch thick, turn it 90°F, and fold in thirds again.

  3. Dust your work surface with flour again, if needed, and roll the dough to a thickness of 1/2 to 3/4 inches. Using a biscuit cutter or other similar tool, cut circles from the dough and place them on your prepared baking sheet.

  4. Re-roll the scraps. You'll get a better rise out of the next batch of biscuits if you keep the dough oriented the same way instead of rolling it up or smashing it together. The folding in the previous steps has created horizontal layers that cause the biscuits to rise, just like the layers in pastry crust or puff pastry. So, when you combine the scraps, keep the horizontal layers horizontal as much as possible. Cut more biscuit from the rerolled biscuit dough. If you don't want to end up with even more scraps, consider cutting the second batch into squares instead of rounds.

  5. Rather than rolling the scraps a third time, you can make a few hand-formed biscuits from whatever is left after the second batch is cut They won't be pretty, but they're fine as samples for the cook.

  6. Brush the tops of the biscuits with butter milk or melted butter, if desired, and bake at 400°F until lightly browned, about 20 minutes


My Final Products: I used a scalloped biscuit cutter for both.  I think they looked nice this way.  Next time I might roll them a little thicker and cook them for a few minutes less.  They over cooked a little, but tasted delicious. 


Saturday, April 2, 2011

Spring Inspiration

It's April!  Spring is here and that is always an inspiring time of year.  And for cooks like me, this time of year is especially inspiring as we start dreaming of all the beautiful produce that will become available over the next few months. We start preparing in our minds the lovely spring holiday foods and the summer barbecues that will soon follow,... Oh the recipes...

But my job is not really to create recipes from all this dreaming, not that I haven't in the past or that I won't in the future, (truth be told I rarely use recipes anymore) but generally I teach beginners and those that are challenged when it comes to cooking even the basics, like how to boil water.  Because that can be a little boring at first, I need to inspire my students and help them get inspired on their own to pull out those pots pans and clean off those dusty knives and utensils that have gone unused since they bought them and attempt to make some good food. 

So first, how do I get inspired.

1. Other Food Blogs:  I so appreciate and honor the work of others who have all ready been doing this awhile.  The photos and the inspired creations of today's recipe and food lifestyle bloggers are amazing.  Those mouthwatering photographs are often all I need to get cooking and baking.


2.  Cookbooks.  I have marked a lot of favorite recipes over the years and sometimes, for me it's just like looking though old photo albums of friends from high school or college and saying  I really need to give that person a call.  When going through the cookbooks it's, "I really haven't made that dish in a long time.  I'll add it into my meal plan as soon as I can."

3. Farmer's Markets and Produce Isles.  Walking past all those strawberries and cherries, I get visions of pulling yummy pies and tarts from the oven, mixing them into ice creams and chopping them onto salads.  I see peppers, green onions, green beans, carrots, peas and new potatoes mixed with healthy grains and beans alongside specially prepared meats spread out all over my lovely Passover or Easter table.


4.  Cooking Shows.  I'm not an addict like some people, but a few shows really help get my creative juices flowing. Although I'm entertained by watching Iron Chef and the great celebrity restaurant chefs cooking the gastronomic equivalents of the empire state building.  I'm mostly inspired by those good home chefs that were once like me creating and preparing mouthwatering food at home for their friends and loved ones.


5. Good Restaurants:  As I've mentioned before, with a little one around, we don't often go out for dinner, but when we do we make it count.  My husband and I both have good and adventurous pallets, so we love to try new foods and culinary experiences.  Then we try and figure out how we can replicate those dishes we liked the most at home.  Some are easy - simple ingredients put together in ways I hadn't thought of before.  Then others are more complex, spices and flavors I recognise but can't quite put my finger on.  These are the most fun trying to recreate.  Sometimes I hit it and sometimes I come up with something completely new that was inspired by that restaurant chefs excellent work.  Often I will aquire a new technique I hadn't gotten around to learning yet.  Either way we win. 


My easy tip to new cooks:  Every time you go grocery shopping, pick up at least one new ingredient you haven't tried before, bring it home and cook some cool dish with it.  Look a recipe up on the Internet or create a whole new dish, whatever suits you. You'll learn a lot and you'll get some new inspiration each week.